Living in a yurt doesn’t mean sacrificing comfort. These circular tents have sheltered nomadic cultures for centuries with their sturdy yet simple design. This guide will unveil ways to turn the traditional yurt into a cozy haven, ensuring you feel right at home.
Discover how snug your round abode can be!
Key Takeaways
- A yurt needs a foundation, like a wood deck or concrete piers, to stay stable and dry.
- You can have modern comforts in a yurt, such as electricity, plumbing, and insulation for year-round living.
- When building your yurt, use durable frames and fabrics; plan the interior wisely with space-saving furniture.
- Outdoor spaces enhance your yurt’s charm; consider patios, gardens, cooking areas, and showers for added comfort.
- Insulation is key to staying cozy in all seasons; choose materials with high R-values for walls, roofs, and floors.
Understanding Yurts
Delving into the world of yurts unlocks a unique fusion of traditional charm and modern functionality; these circular dwellings, steeped in history, are more than just architectural marvels—they’re customizable havens that adapt to your lifestyle needs.
Grasp their essence and explore how they blend seamlessly with today’s amenities, all while maintaining their iconic design that has weathered centuries.
What is a Yurt?
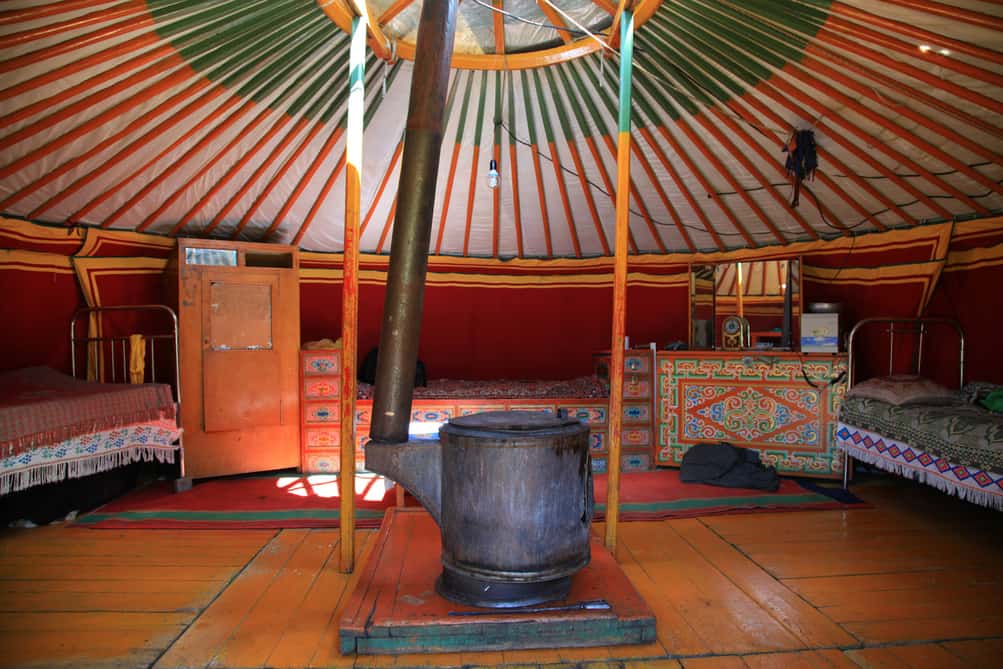
A yurt is a round tent with a wooden frame and lattice walls. Nomadic tribes in Central Asia have lived in these structures for centuries. They’re designed to be portable, which helped nomads move easily across the Eurasian steppe.
The key parts of a yurt are its circular shape, sturdy door frame, and domed roof, often topped with a compression ring.
Today’s yurts mix tradition with modern tweaks. Some use metal or PVC to make the frames stronger and more flexible. People around the world enjoy these cozy homes as part of sustainable living or even just for fun camping trips.
Yurts stand out for their unique design that brings together simplicity, efficiency, and comfort all under one rounded roof.
Does a Yurt need a foundation?
Understanding what a yurt is sets the stage for exploring how to secure it to the ground. Yes, you’ll need some sort of foundation. But don’t worry, it doesn’t have to be complicated.
A popular choice is a round wood deck that matches the yurt’s diameter. This keeps your yurt stable and raises it off the ground, protecting it from moisture and critters. You can even attach your yurt directly to this platform, ensuring everything stays put even in strong winds or bad weather.
Setting up your foundation right makes sure you have a solid base to build on. There are other options too, like concrete piers or compacted gravel beds if you’re looking for something different or more permanent.
Whichever route you choose, just make sure it suits your site and gives enough support for all of your adventures in tiny home living!
Can a Yurt have modern conveniences?
Yes, a yurt can have all the modern conveniences you find in traditional homes. Think electricity for lights, cozy electric heaters, and even charging stations for your Kindle reader.
You can have partitioned spaces inside your yurt with separate bedrooms and living areas. It’s possible to fit sleek kitchens complete with cabinets and counters that suit the yurt’s unique shape.
Plumbing is no problem either; install pipes for a fully functional bathroom or kitchen sink. Your yurt can also hook up to the grid or a septic system for waste management. Electricians are able to run wiring through the floor so you can plug in appliances anywhere you want them.
Embrace comfort without sacrificing the charm of living off-grid in a Mongolian-inspired home!
What Factors Should I Consider When Choosing My Yurt for Maximum Comfort In Any Climate?
When choosing the right yurt for maximum comfort in any climate, consider the insulation, ventilation, and roof configuration. Insulation is crucial for retaining warmth in cooler climates, while proper ventilation helps with airflow in hotter climates. Additionally, a dome-shaped roof can help with snow shedding in colder, snowy regions.
Gathering and Choosing Materials for Your Yurt
You’ll need a sturdy frame for your yurt, and materials like wood or metal are common choices. Find wooden lattice or lightweight metal to create the walls that fold out in an accordion-like fashion.
This provides a strong base while still being portable. The compression ring at the top is crucial; it holds your roof rafters in place. Use bolts and screws to secure these elements together for a solid structure.
Covering your yurt is just as important as the frame—it keeps you dry and comfortable inside. Opt for fabrics such as canvas or vinyl, which are waterproof yet allow your yurt to breathe.
This helps prevent mold and condensation from forming inside. You also need good insulation, especially if you plan on staying comfy year-round—look into materials with a high R-value to keep heat in during winter months without stifling summer breezes.
Remember, proper rope or bungee cords will hold everything together tightly once assembled.
Next up is finding the perfect spot for setting up your new home..
Site Selection and Preparation for Your Yurt
Choosing where to build your yurt is just as important as the yurt itself. The right spot will make life in your tiny home cozy and pleasant.
- Look for flat, accessible land. Your yurt needs a stable base, so find an area without slopes.
- Make sure the site isn’t prone to flooding. Check the history of water flow in the area to stay dry.
- Seek shelter from strong winds by placing your yurt near natural windbreaks like trees or hills.
- Find a spot that gets sunshine but also has some shade. This balance keeps your yurt comfortable in different weather.
- Learn about local wildlife. Avoid areas with lots of insects or animals that might harm your yurt.
- Think about privacy. Place your yurt away from busy paths but close enough to community resources if needed.
- Check with local authorities about building codes. Some places have rules about what you can build and where.
- Get all the right permits before starting construction. This prevents legal problems down the line.
- Plan for utilities like water and electricity. Decide if you want to connect to public services or live off the grid.
- Consider internet and phone service if you need it. Find out which providers offer service in that area.
- Talk with professionals such as a plumber or an electrician if you plan on adding modern facilities inside your yurt.
- Decide on waste management solutions, whether it’s a septic system, composting toilet, or something else.
Building Your Yurt: Step-by-step Guide
Now that you’ve picked the perfect spot, it’s time to build your yurt. This guide will take you through the steps so you can create a cozy home.
- First, lay out all your materials. Make sure you have the frame parts and cover ready.
- Next, start with the lattice walls. Stand them up and stretch them out in a circle.
- Attach the door frame to a section of the lattice wall. Ensure it’s secure and straight.
- Now, place the compression ring at the top center of your structure.
- Securely attach each roof rafter from the compression ring to the lattice walls.
- Pull over and fasten down your waterproof cover. This could be canvas or vinyl.
- Add translucent walls or a roof if desired, for natural light inside your yurt.
- Install insulation to keep warm in winter and cool in summer—consider using materials with a good R-value.
- Cut out sections for any windows you want and attach frames securely.
- For power, set up electrical connections by running wiring safely within the frame before sealing up walls.
- Plan for heating elements such as stoves or chimneys; properly install these for safety and efficiency.
Customizing Your Yurt for Maximum Comfort
Customizing your yurt goes beyond mere aesthetics; it’s about creating a haven that aligns with your comfort and lifestyle needs. It’s where smart design meets cozy living, ensuring every inch of your circular abode enhances the quality of life within its curved walls.
How to plan your Yurt’s interior layout
Planning your yurt’s interior layout takes creativity and smart design. Here’s how to make the most of your space:
- Draw a floor plan. Use paper or a digital app to sketch where everything will go. Think about your bed, table, and where you’ll cook.
- Pick space-saving furniture. Choose items that can fold away or serve multiple purposes, like a sofa bed or a bench with storage inside.
- Plan for privacy. Use screens or curtains to divide the sleeping area from the living space if you’re not alone.
- Focus on the flow. Place furniture so you can move freely around your yurt without bumping into things.
- Decide on flooring. It should be durable and easy to clean; something like linoleum or bamboo works great in yurts.
- Install proper lighting. Add lamps and lights in dark corners so you can see well at night.
- Make room for a stove or heater. Stay warm with a wood stove in colder months; just be sure it’s safe and vented correctly.
- Use vertical space. Hang shelves high up for books and supplies without taking up floor area.
- Include cozy touches. Add rugs, cushions, and throw blankets to make it feel like home.
- Think about windows. Plan your layout so that seating areas get nice views outside.
How to add modern amenities to your Yurt
Once you have your yurt’s interior layout figured out, it’s time to add those modern touches that make life easier and more comfortable. Bringing in modern amenities can transform your yurt into a space that feels both rustic and contemporary.
Install Electrical Wiring
- Plan the layout of your outlets and lights.
- Run wiring under the floor or along the walls.
- Use a drill to create holes for outlets.
- Connect wiring to a main power source or breaker box.
Set Up Plumbing Systems
- Decide where you want sinks, showers, or toilets.
- Work with a plumber to install pipes after setting up your yurt.
- Hook plumbing up to sewers or septic tanks on your property.
Add Heating and Cooling
- Choose an energy-efficient air conditioning unit for summer.
- Install a wood stove or portable heaters for winter warmth.
- Consider solar technology for off-grid living.
Integrate Kitchen Appliances
- Pick compact appliances that fit well in small spaces.
- Ensure there is enough ventilation for cooking areas.
Set Up Bathroom Facilities
- If you’re not connecting to plumbing, consider composting toilets.
- Install outhouses or an outdoor shower for simpler solutions.
Enhance Connectivity
- Get internet service set up in your yurt if available in the area.
- Use solar chargers or battery packs to keep devices powered.
Incorporate Insulation Solutions
- Look at insulation materials with high R-values for effective thermal control.
- Insulate walls and roofs by fitting materials within interior layers.
Create Storage Spaces
- Build shelves and cabinets around the perimeter where walls meet the ceiling.
- Use furniture with built-in/ storage to save space.
Ensure Proper Lighting
- Hang lanterns or string lights for a cozy atmosphere.
- Place windows strategically to maximize natural light during the day.
How to insulate your Yurt for year-round use
After adding modern amenities, it’s crucial to insulate your yurt for comfort in all seasons. Proper insulation helps keep the space warm in winter and cool in summer. Begin by insulating the walls and roof with materials like fiberglass or foam board.
These options are effective at trapping heat and maintaining a steady temperature inside.
Next, focus on the floor of your yurt. Reflective insulation can be an excellent choice here, reflecting heat back into the living space to prevent loss through the ground. Ensure you also have a good heating system paired with air vents for adequate ventilation.
This combination will create a cozy environment no matter what the weather outside is doing.
The Best Ways to Use Your Yurt’s Outdoor Space
Transform the area outside your yurt into a serene extension of your living space, where endless possibilities await to enhance your connection with nature and elevate your outdoor lifestyle—discover more within our guide.
Building a comfortable patio
Building a comfortable patio can turn your yurt into a cozy home. Here’s how to make the most of your outdoor space:
Pick the perfect spot.
- Look for level ground near your yurt.
- Avoid areas where water pools during rain.
Think about the sun and wind.
- Place your patio where you’ll get morning light but avoid harsh afternoon sun.
- Use natural windbreaks like trees or terrain to protect your area.
Choose durable materials.
- Go for patio stones or concrete that can handle weather changes.
- Ensure any wood used is treated or naturally resistant to rot and insects.
Make it accessible.
- Create a path from your yurt door to the patio with stepping stones or gravel.
- Consider adding a ramp if you want an accessible design.
Plan for privacy and views.
- Set up privacy screens with lattice panels or tall plants if you’re close to others.
- Angle your patio toward the best view of nature around you.
Add comfortable seating.
- Pick chairs and couches that will last outside, like those made from metal, teak, or wicker.
- Cushions should have outdoor fabric that resists moisture and fading.
Include a shade structure.
- Install an awning or umbrella to give you relief from the sun on hot days.
- Pergolas can also provide shade while letting some sunlight through.
Brighten up with lighting.
- String lights create a warm glow for evenings outside.
- Solar – powered lanterns are great because they don’t need wires and save energy.
Stay warm during cool nights.
- A fire pit makes for a cozy gathering place when temperatures drop
- Portable heaters are another option if open flames aren’t allowed at your site.
Add plant life around your patio.
- Cultivate a garden with flowers and herbs in containers for fresh scents and color
- Shrubs along the edges can soften the look of your outdoor living space.
Keep it tidy with storage solutions
- Build benches with hidden compartments to stow away cushions and tools
Cultivating a garden around your Yurt
Creating a garden around your yurt can bring beauty and food to your doorstep. With careful planning and the right plants, your yurt’s outdoor space can become a lush oasis.
- Select plants that thrive in your climate to ensure a successful garden.
- Use the round wood deck foundation of your yurt as a base to create raised beds for vegetables and flowers.
- Incorporate native plants for lower maintenance and better support for local wildlife.
- Take advantage of the updraft venting of the yurt to regulate temperature around delicate plants.
- Install a drip irrigation system for efficient watering and to save time.
- Add mulch to garden beds to retain moisture, suppress weeds, and improve soil health.
- Place climbing plants near the yurt; they can use it as a natural trellis.
- Keep tools and seeds organized in outdoor storage space or inside an adjacent shed.
- Use compost from kitchen scraps to enrich the soil, promoting plant growth around your home.
- Arrange seating areas where you can relax and enjoy the beauty of your garden.
Creating an outdoor cooking and social area
After you have your garden in place, it’s time to think about entertaining. A well-designed outdoor cooking and social area makes your yurt the perfect spot for gatherings. Here’s how to build an inviting space right outside your home-on-the-go:
- Choose the right spot: Find a level area close to your yurt. Ensure it’s away from trees that can drop leaves or sap onto your cooking space.
- Plan the layout: Sketch a design with areas for grilling, eating, and relaxing. Include enough room for people to move around comfortably.
- Install a durable surface: Put down patio stones or pavers to create a stable floor for tables and chairs. This also keeps mud and dust at bay.
- Select the right grill or stove: Pick an outdoor cooker suitable for your needs, whether it’s a simple grill or a full outdoor kitchen setup.
- Add seating and tables: Go for weather-resistant furniture. Make sure there’s enough seating for everyone to enjoy meals together.
- Light up the space: Hang string lights or install solar-powered lamps so the fun can continue after dark.
- Build protection from the elements: Set up umbrellas or awnings so guests stay dry even if rain comes during your barbecue.
- Keep tools handy: Have cooking utensils within reach by hanging them on hooks or storing them in nearby boxes or cabinets.
Adding outdoor storage space
Now that you’ve set up a cozy place for outdoor cooking and gatherings, let’s focus on adding storage space. This will help you keep your yurt clutter-free and organized.
- Choose durable materials: Opt for weather-resistant woods like cedar or composite materials to ensure your outdoor storage can handle the elements.
- Plan the size: Decide on the size of your storage unit based on what you plan to store—think about garden tools, camping gear, or outdoor cushions.
- Consider built-in seating: Combine function with comfort by creating a storage bench. It gives you extra seating for guests and a place to hide away items.
- Go vertical: If ground space is limited, use wall-mounted shelves or racks. This takes advantage of height and doesn’t take up precious floor space.
- Secure your belongings: Install locks on your storage units to protect valuable items. This gives you peace of mind when you’re away from your yurt.
- Keep it close to your yurt: Make sure your storage is nearby for easy access, especially if you need something quickly while inside the yurt.
- Blend with surroundings: Paint or stain the storage in colors that match the natural environment or your yurt’s design to maintain an aesthetic flow.
- Add protective covers: If using open shelving, consider using waterproof covers to shield items from rain or morning dew.
Making an outdoor shower adjacent to your Yurt
Creating an outdoor shower by your yurt is both smart and refreshing. It allows you to enjoy the beauty of nature with the comfort of home close by.
- Choose a spot for your outdoor shower that’s close enough for convenience but also offers privacy. Think about the view and how it feels to stand there.
- Plan for proper water supply and drainage. You don’t want water pooling around your yurt or ruining your garden.
- Design the shower area to match your yurt’s style. Use materials and colors that blend with the natural surroundings.
- Build walls or a curtain for privacy, making sure they fit in with the rest of your yurt setup.
- Consider using solar-powered heaters to warm up your water. This eco-friendly option saves energy and blends well with an off-grid lifestyle.
- Make sure you have the right tools and materials before starting. You might need wood, plumbing supplies, and fixtures from a hardware store.
- Install a flooring that allows water to drain away quickly. Wood slats or stones work well and add to the natural look.
- Decorate the space with plants or stones for a serene feeling. You can make it like a little spa right outside your door.
Yurt Maintenance for Long-lasting Comfort
8. Yurt Maintenance for Long-lasting Comfort: Keeping your yurt in top condition is key to enjoying its comforts year after year, and with the right know-how, you’ll ensure it remains a cozy haven against the elements—dive into our maintenance tips to discover how simple preserving your sanctuary can be.
Caring for fabric components
Keep your yurt’s fabric parts clean and free from tears. Use gentle soaps and avoid harsh chemicals when washing them. Insulate the roof and walls to protect these materials from weather damage.
It’s smart to order insulation when you buy your yurt—this way, the fabric stays safe right from the start.
For extra safety, pick flooring that shields the bottom part of your yurt’s walls. Run electrical wires through the platform instead of along the fabric, to prevent harm. Taking care of these pieces helps your cozy home last a long time.
Now let’s talk about keeping other parts of your yurt in top shape too.
Caring for other components
Your yurt’s wood parts need attention to stay strong. Treat the door, lattice walls, and roof poles with a wood sealant. This protects them from rain and sun damage. Check them yearly for signs of wear or rot.
Metal fixtures can rust over time. Use a wire brush to scrub off any rust spots on hinges or brackets. After cleaning, coat these areas with a weatherproofing product designed for metal protection.
Take care of your stovepipe too if you use one for heating. Make sure it is clear of soot and debris to prevent fires. Inspect it before each cold season starts.
For the windows in your yurt, clean the frames and check the seals often to stop drafts and keep out moisture.
By treating all parts of your yurt well, you help make sure it stays cozy year after year.
Conclusion
Making your yurt cozy and unique is a fun journey. Remember, blend tradition with modern touches for the best experience. Keep it simple, focus on comfort, and don’t forget to care for your home.
Enjoy creating a space that’s all your own. Happy yurting!
FAQs
What is a Mongolian yurt, and why are they popular as tiny homes?
A Mongolian yurt is a portable, round tent covered with skins or felt used by nomads in Central Asian countries like Mongolia. Today, people love them for their unique style and cozy feel which makes them perfect as tiny homes.
Can you really design the inside of a yurt to be comfortable?
Absolutely! With clever interior design, you can transform the inside of your mongolian ger or yurta into a warm and inviting space that’s both stylish and comfy—just like any modern home.
How do I keep my yurt warm in winter or cool in summer?
Focus on insulation! The “R-value” measures how well material insulates; higher R-values mean better temperature control so your yurt stays snug in winter and chill in summer.
Are there special considerations when furnishing my Mongolian ger?
Indeed, since the walls curve inward, furniture should fit this shape—think circular sectionals or foldable pieces that maximize space without cramping up your style.
Is it possible to live off-grid in a yurt comfortably?
You bet! With the right setup—think solar panels for power, partition walls for privacy, maybe even a cellar for storage—a well-planned yurt supports an adventurous off-grid lifestyle beautifully.
What if I want separate rooms within my Yurt?
Easy-peasy—with partition walls or canvas dividers you can split up the open space into different areas for sleeping, dining… whatever you need!
Leave a Reply